

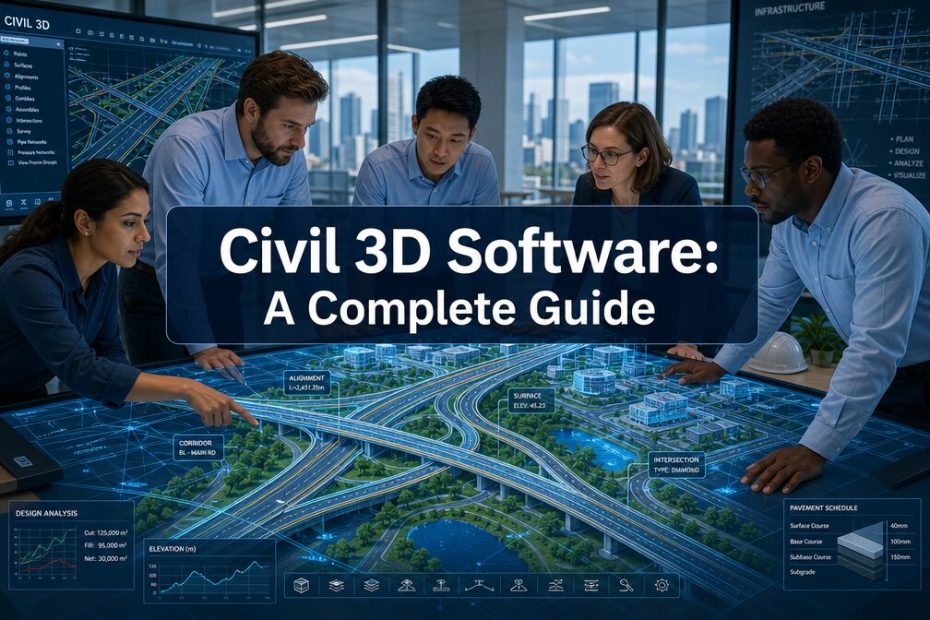
Autodesk Civil 3D is a comprehensive design and documentation software solution for civil engineering projects. It uses a dynamic, model-based approach built on the AutoCAD platform to help professionals design, analyze, and document infrastructure projects like roads, land developments, and water systems more efficiently. Basically, it connects design and documentation to ensure changes in one place automatically update everywhere else.
I’ve spent years in the trenches of infrastructure design, and I can tell you that the shift from traditional 2D drafting to dynamic 3D modeling isn’t just an upgrade, it’s a fundamental change in how we approach projects. Before tools like Civil 3D software became the standard, a simple change to a road’s alignment could trigger days of manual redrafting of profiles, cross-sections, and earthwork calculations. Today, that same change can be updated across all project documents in minutes. This guide is designed to be your go-to resource, whether you’re a student just starting out, an AutoCAD user considering the switch, or a seasoned professional looking to refine your Civil 3D workflow.
Key Takeaways
- What is Civil 3D? It’s a specialized engineering design software for civil infrastructure projects that uses a 3D model-based environment to streamline workflows. It’s built on the familiar AutoCAD platform.
- Dynamic Model: The core strength of Civil 3D is its dynamic model. When you change an element (like a road alignment), all related objects (like surfaces, profiles, and labels) update automatically, saving significant time and reducing errors.
- Civil 3D vs. AutoCAD: While AutoCAD is a general-purpose 2D and 3D drafting tool, Civil 3D is purpose-built for civil engineering with intelligent objects and automated tools for tasks like grading, corridor modeling, and pipe network design.
- Core Features: Key capabilities include survey data management, surface and terrain modeling, grading design, transportation and road design software tools (corridors, alignments, profiles), and pipe network design for stormwater and sanitary systems.
- BIM for Infrastructure: Civil 3D is a cornerstone of Building Information Modeling (BIM) for infrastructure, enabling better collaboration, clash detection, and project visualization from concept through construction.
- Who Uses It? The primary users are civil engineers, surveyors, designers, and technicians working on land development, transportation, and water resource projects.
- Learning Curve: While powerful, Civil 3D has a steeper learning curve than standard AutoCAD due to its complexity. Proper Civil 3D training is essential for proficiency.
What is Civil 3D Software Used For?
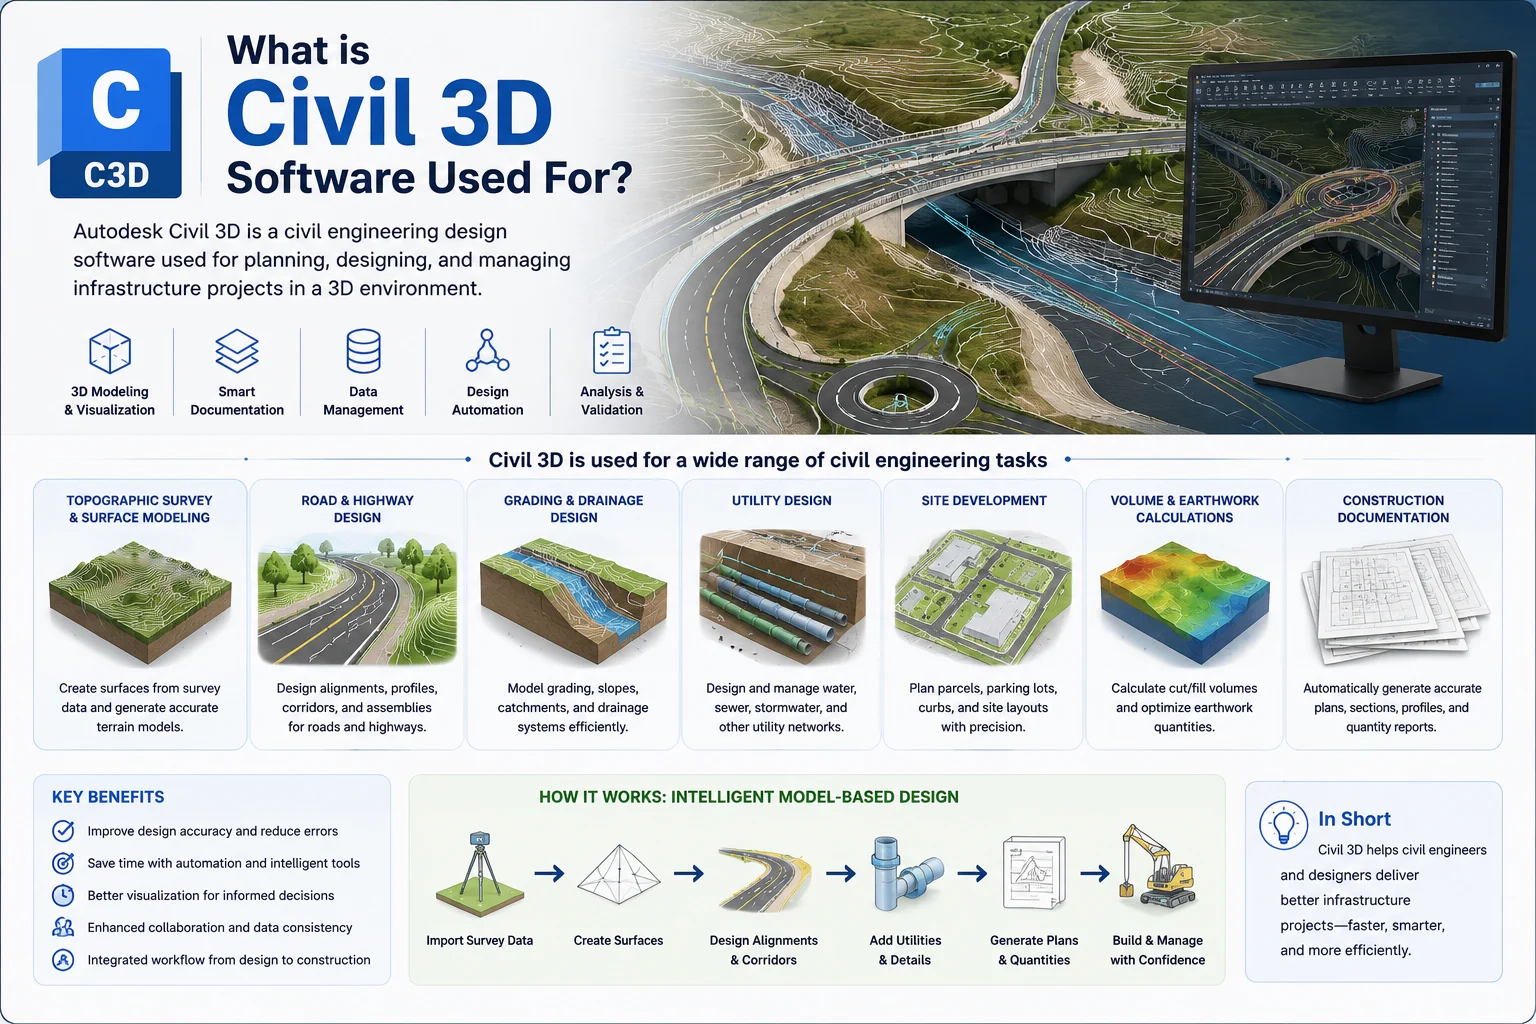
At its core, Autodesk Civil 3D software is used to design and document civil engineering and infrastructure projects within a dynamic 3D model-based environment. It’s the go-to tool for everything from residential land development to major highway systems because it automates time-consuming tasks and keeps all parts of a design interconnected. In other words, it’s not just for drawing lines; it’s for building intelligent models that understand the relationships between objects.
When I first started, we used AutoCAD for everything. We drew lines, arcs, and circles to represent roads, pipes, and property boundaries. The problem was, they were just dumb lines. If the road alignment changed, you had to manually redraw the profile, recalculate the elevations, and adjust every single cross-section. Civil 3D changed all that. Now, we create an intelligent alignment object. If we move it, the associated profile view updates instantly, the corridor model rebuilds itself, and the earthwork volumes are recalculated on the fly. This dynamic relationship is the fundamental concept that makes it such a powerful piece of engineering design software.
Civil 3D is used across a wide spectrum of project types:
- Transportation: Designing roads, highways, roundabouts, and railway corridors. This includes creating horizontal and vertical alignments, modeling complex corridor assemblies, and analyzing sight distances.
- Land Development: Creating plans for residential, commercial, and industrial sites. This involves site design, parcel layout, and precise grading design to ensure proper drainage and earthwork balance.
- Water Resources: Designing storm sewer systems, sanitary sewer networks, and pressure pipe systems for water distribution. The software’s pipe network design tools can handle gravity-based and pressure systems with rules-based layouts.
- Surveying: Processing and managing survey data directly from field equipment. Surveyors use it to create base maps, perform calculations, and generate detailed terrain models.
- Environmental: Modeling landforms for site remediation, creating landfill designs, and analyzing watersheds and water flow patterns.
Key Civil 3D Features That Revolutionize Project Workflows
The true power of AutoCAD Civil 3D lies in its specialized features that go far beyond basic drafting. These tools are purpose-built for the challenges of infrastructure design, automating complex calculations and maintaining design integrity. Understanding these core features is the first step in mastering this civil engineering CAD software.
Here’s a breakdown of the features I find most critical in my day-to-day work:
- Surface Modeling: This is the foundation of almost every project. Civil 3D allows you to create highly accurate 3D digital terrain models from various data sources, including survey points, breaklines, and DEM files. You can then use these surfaces for contour generation, slope analysis, and volume calculations (cut/fill).
- Alignments and Profiles: Alignments define the horizontal path of linear features like road centerlines or utility lines. Profiles represent the vertical aspect along that alignment. In Civil 3D, these are dynamic. You can graphically design the vertical curve of a road on a profile view, and the software ensures all the geometric constraints are met.
- Corridor Modeling: This is arguably one of the most powerful features for transportation engineering. A corridor model is a 3D representation of a road, railway, or channel. You build it by combining an alignment, a profile, and a cross-sectional template called an assembly. The magic happens when you change any of those inputs, the entire 3D corridor, including all its slopes, ditches, and material layers, rebuilds itself automatically.
- Grading Design: Civil 3D provides automated tools for grading land areas. You can define feature lines with specific elevations and slopes, and the software will create a finished surface that meets your design criteria. This is essential for creating building pads, parking lots, and drainage ponds while balancing earthwork volumes.
- Pipe Network Design: Whether for storm drainage or sanitary sewers, the pipe network design tools are a lifesaver. You can lay out pipes and structures using a rules-based system that helps maintain proper slopes and cover depths. The networks are intelligent; they can detect clashes and are represented in both plan and profile views.
- Parcel Layout: For land development projects, the parcel tools automate the creation of property lots. You can define parcels based on specific size, frontage, and depth requirements, and the software will generate them along a right-of-way. It also handles all the annotation and labeling automatically.
- Dynamic Quantity Takeoff: Because you are building a 3D model with defined materials (e.g., asphalt, gravel, topsoil), Civil 3D can perform quantity takeoffs directly from the model. This makes earthwork calculations and material estimates faster and far more accurate than traditional methods.
Is Civil 3D Better Than AutoCAD? A Direct Comparison
This is one of the most common questions I hear, especially from designers who are comfortable and proficient with standard AutoCAD. The short answer is: for civil engineering projects, yes, Civil 3D is unequivocally better than AutoCAD. They are different tools designed for different purposes. Using plain AutoCAD for a complex site design is like trying to build a house with only a hammer, you can do it, but you’re ignoring a whole toolbox of specialized, more efficient tools.
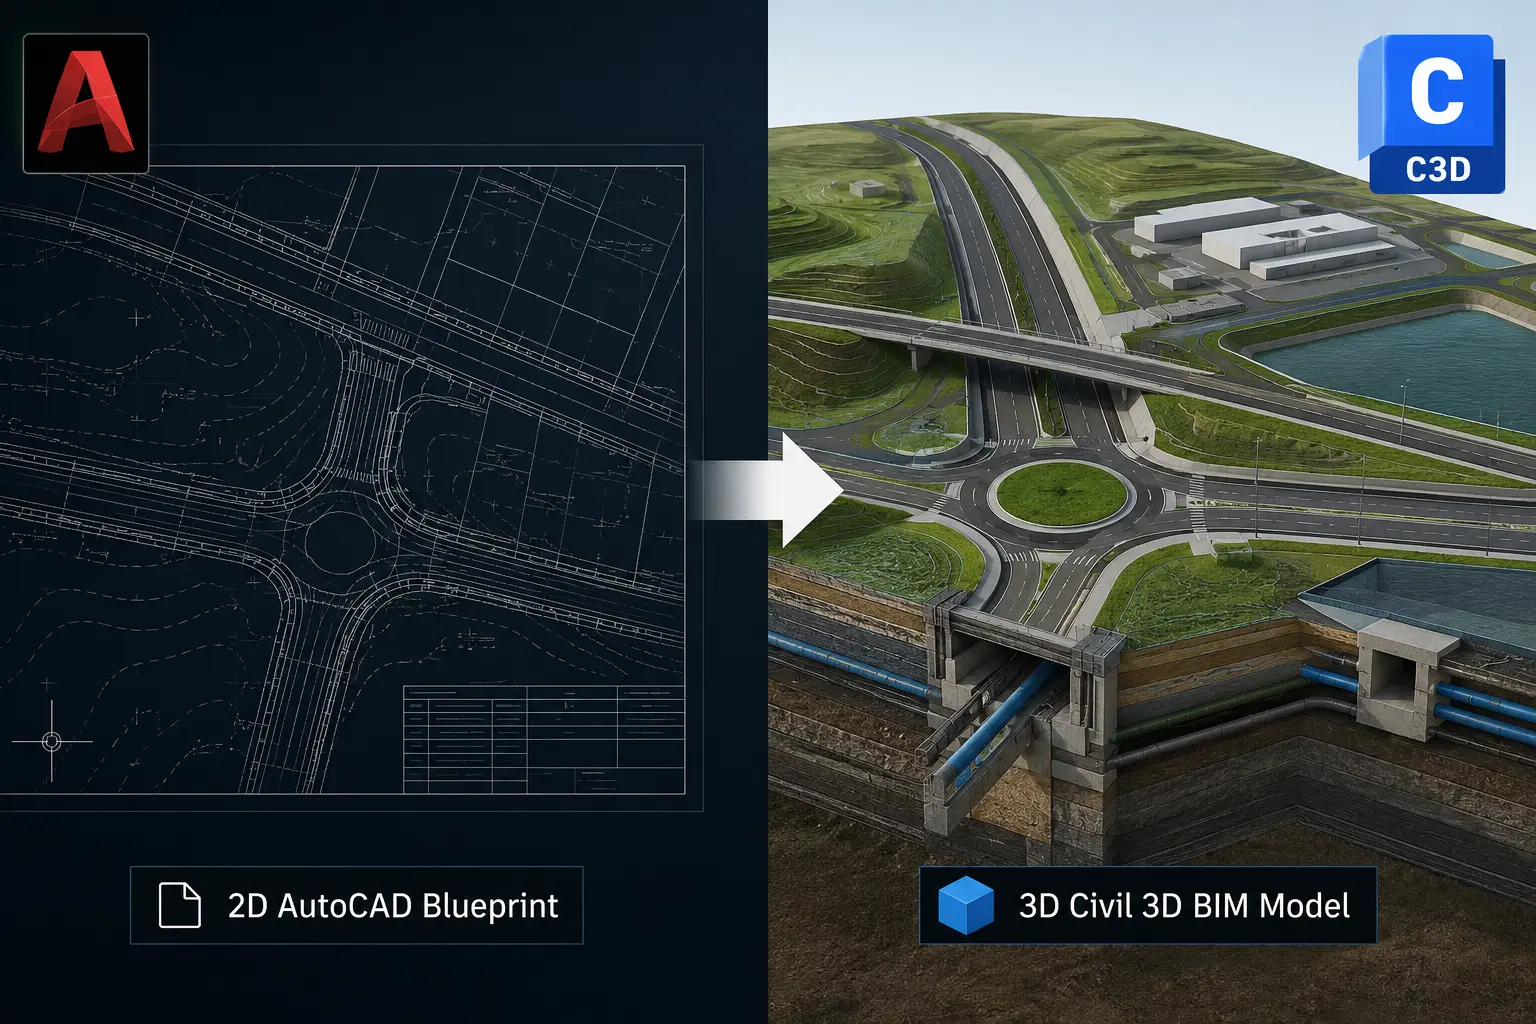
The key difference is the concept of intelligent objects versus basic geometry. In AutoCAD, you draw a line. That line has a start point, an end point, a layer, and a color. In Civil 3D, you create an alignment. That alignment object “knows” it’s a road centerline. It has stationing, design speeds, and geometric constraints. It can have a profile and a corridor associated with it. This intelligence is what drives the automation and efficiency gains.
Here is a table breaking down the core differences:
| Feature / Capability | Standard AutoCAD | Autodesk Civil 3D |
|---|---|---|
| Core Function | General-purpose 2D/3D drafting and documentation. | Specialized civil engineering design and documentation. |
| Objects | Basic geometric objects (lines, arcs, circles, polylines). | Intelligent, dynamic objects (surfaces, alignments, corridors, pipe networks). |
| Design Changes | Manual updates required. Changing one element means redrawing all related elements. | Dynamic updates. Changes to one object automatically propagate to related objects. |
| Surface Modeling | Very limited; requires manual creation of 3D faces or meshes. | Robust tools for creating and analyzing complex digital terrain models. |
| Grading & Earthwork | Manual process involving contour manipulation and area calculations. | Automated grading tools and dynamic volume calculations (cut/fill). |
| Road Design | Manual drafting of alignments, profiles, and cross-sections. | Integrated corridor modeling that builds a complete 3D road model automatically. |
| Pipe Design | Pipes are represented as simple lines or cylinders. No analysis capabilities. | Rules-based pipe network design with clash detection and hydraulic/hydrology integration. |
| Workflow | Drawing-centric. The focus is on creating 2D plans. | Model-centric (BIM for infrastructure). The focus is on building an intelligent 3D model. |
Basically, if your job is to produce a site plan for a major subdivision, a set of construction documents for a highway, or a grading plan for a commercial development, Civil 3D is the right tool. If you need to draft a simple mechanical part or create a basic floor plan, standard AutoCAD is perfectly sufficient.
A Beginner’s Guide to the Civil 3D Workflow
Jumping into Civil 3D for the first time can feel overwhelming. There are a lot of menus, settings, and new concepts to learn. However, most projects follow a similar, logical progression. Understanding this fundamental Civil 3D workflow is the key for beginners to get started and build confidence. Think of it as a roadmap from raw data to finished construction plans.
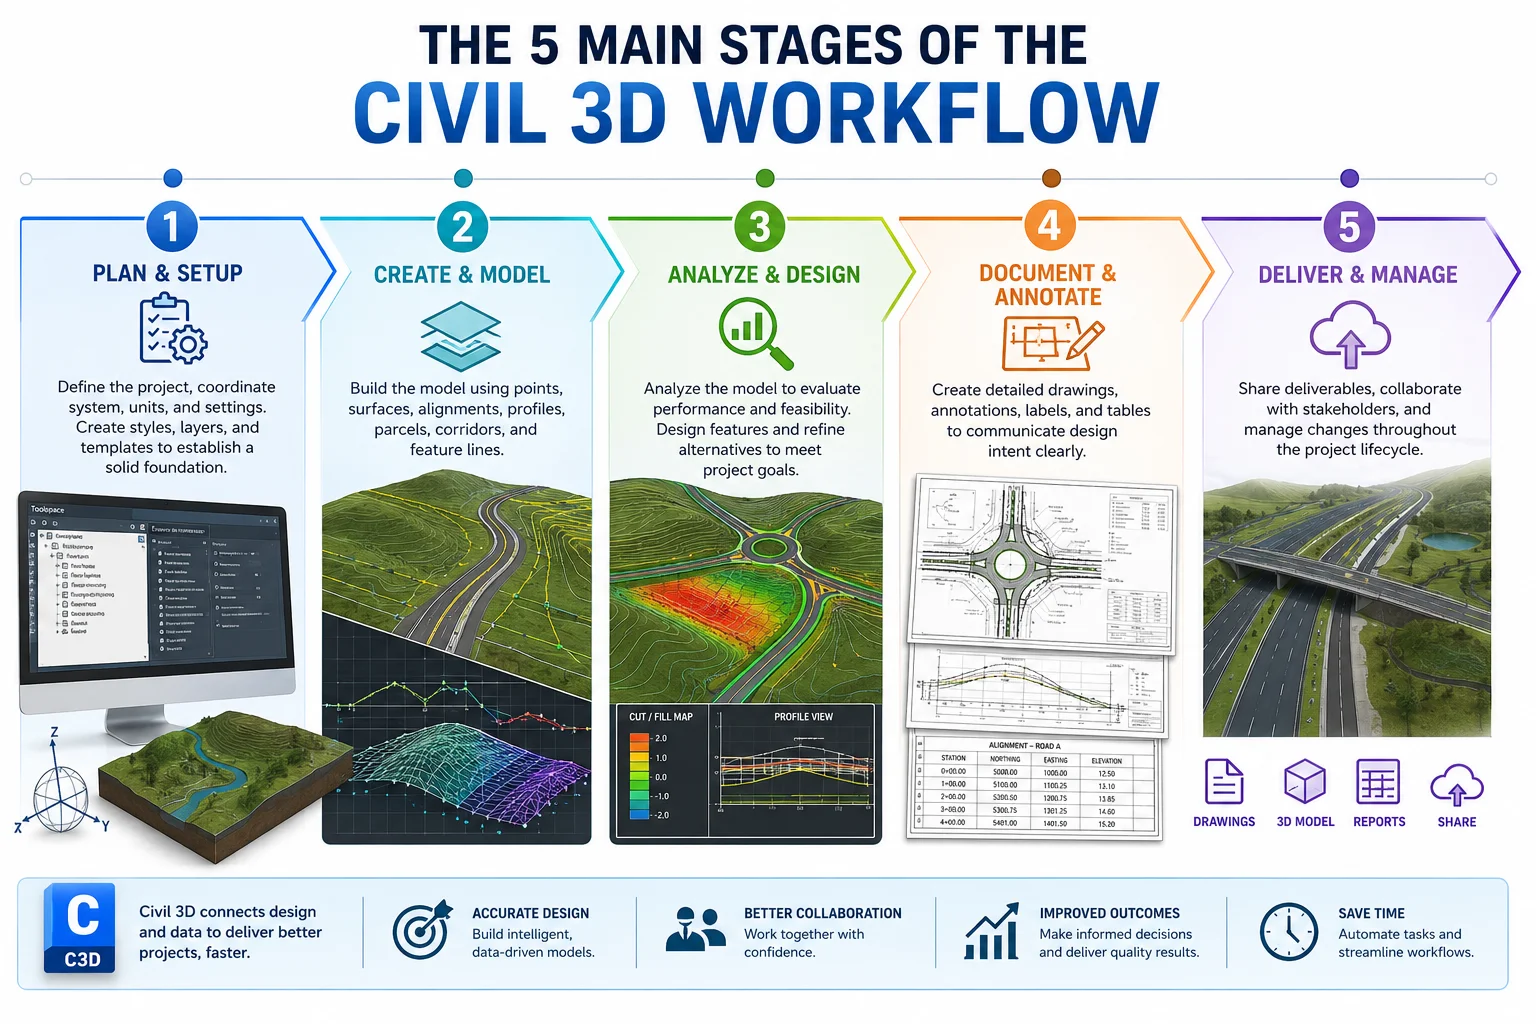
Here is a simplified, step-by-step look at a typical project workflow:
- Project Setup and Data Management: The first step is always setting up your drawing correctly. This involves using a proper template (
.dwtfile) that contains all your company’s styles, layers, and settings. You then bring in your initial data, which is typically survey data. Civil 3D has powerful survey data management tools to import field measurements and process them into survey figures and points that form the basis of your existing conditions map. - Creating the Existing Surface: Using the survey data, you create a digital terrain model (DTM) of the existing site conditions. This “EG” (Existing Ground) surface is a fundamental object that you will reference throughout the design. You can analyze this surface for slopes, elevations, and watersheds to better understand the site.
- Design of Horizontal and Vertical Layout: Now the actual design begins. For a road project, you’ll create an alignment to define the horizontal centerline. For a site project, you might lay out parcels and building footprints. After defining the horizontal layout, you create the vertical design. For an alignment, this means designing a profile that shows the proposed elevations along the centerline, including vertical curves.
- Modeling the 3D Design: This is where you build the complete 3D model.
- For roads, you’ll build a corridor model by applying a typical cross-section (assembly) along your alignment and profile.
- For sites, you’ll use grading objects and feature lines to design elements like building pads, parking lots, and ponds.
- For utilities, you’ll lay out pipe networks, connecting structures and setting pipe inverts to achieve proper flow.
- Analysis and Refinement: With the 3D model built, you can now analyze your design. You can calculate earthwork volumes by comparing your proposed surface to the existing ground surface. You can analyze a corridor’s sight distance or check for clashes between utility networks. This is an iterative process; you use the analysis to refine your design, and the model updates dynamically.
- Producing Construction Documents: The final step is to create the plan sheets for construction. Civil 3D automates much of this. You can generate plan and profile sheets, create cross-sections at specified intervals, and add dynamic labels and tables that are all linked to the model. If a late-stage design change occurs, you simply update the model, and the annotations on your sheets will update automatically.
Understanding Civil 3D Pricing, Licensing, and System Requirements
Before committing to this powerful software, it’s crucial to understand the practical aspects of acquiring and running it. This includes the Civil 3D pricing model, how the license works, and ensuring your hardware can handle the demands of complex 3D modeling.
Civil 3D Pricing and License Model
Autodesk has shifted to a subscription-based model for its software, including Civil 3D. This means you no longer buy a perpetual license but instead pay a recurring fee for the right to use the software. The Civil 3D license is typically offered on the following terms:
- Monthly Subscription: Pay on a month-to-month basis. This offers the most flexibility but is the most expensive option over time.
- Annual Subscription: A one-year commitment that offers a significant discount compared to the monthly rate. This is the most common choice for businesses.
- 3-Year Subscription: The most cost-effective option, providing the largest discount for a long-term commitment.
As of early 2026, you can expect an annual subscription for a standalone Civil 3D license to be in the range of $2,500 to $3,000 USD. However, prices can vary by region and are subject to change. It’s also important to note that Civil 3D is included in the Autodesk Architecture, Engineering & Construction (AEC) Collection. This collection bundles Civil 3D with other essential software like Revit, AutoCAD, and InfraWorks for a higher price, but it often provides better value for firms that use multiple Autodesk products.
Civil 3D System Requirements
Civil 3D is a demanding application, especially when working with large surfaces, complex corridors, and point cloud data. Running it on an underpowered machine will lead to frustration, slow performance, and crashes. While you should always check the official Autodesk website for the latest requirements for the specific version you are installing, here are some general guidelines for a good user experience in 2026:
- Operating System: Windows 10 or Windows 11 (64-bit). Civil 3D is not available for macOS.
- Processor (CPU): A fast multi-core processor is essential. Look for a base speed of 3.0 GHz or higher. Both Intel and AMD processors are suitable.
- Memory (RAM): 16 GB is the absolute minimum. For professional use with large models, 32 GB is strongly recommended, and 64 GB is ideal.
- Graphics Card (GPU): A dedicated graphics card with at least 4 GB of VRAM is necessary. Look for workstation-grade cards like the NVIDIA Quadro or AMD Radeon Pro series, as their drivers are optimized for CAD and BIM applications.
- Storage: A Solid State Drive (SSD) is a must. The speed of an SSD dramatically improves file open times, drawing regeneration, and overall software responsiveness. A drive with at least 512 GB of space is recommended to accommodate the software and large project files.
- Display: A high-resolution monitor (1920×1080 or higher) is recommended to provide ample screen real estate for the various tool palettes and drawing area. Many power users opt for a dual-monitor setup.
Investing in proper hardware is not the place to cut corners. The productivity gains from a smooth, responsive system will far outweigh the initial hardware cost.
Conclusion
Navigating the world of civil engineering software can be complex, but Autodesk Civil 3D has firmly established itself as the industry standard for a reason. Its dynamic, model-based approach transforms the design process from a static drafting exercise into an intelligent, integrated workflow. By leveraging its powerful features for surface modeling, corridor design, and pipe networks, you can not only improve your efficiency but also the quality and accuracy of your designs.
For those just starting, the learning curve can seem steep, but the investment is well worth it. Begin by mastering the core workflow, from managing survey data to producing final construction documents. For experienced AutoCAD users, making the switch requires a shift in mindset from drawing-centric to model-centric thinking, but the benefits in coordination and automation are immense.
Your next step is to get hands-on. If you’re a student, take advantage of the free educational license. If you’re a professional, download the free trial or explore the wealth of Civil 3D training resources available online, from Autodesk’s own learning portal to dedicated YouTube tutorials. Start with a small, simple project to build your confidence. The sooner you embrace the 3D model, the sooner you’ll unlock a more efficient and powerful way to shape the infrastructure of tomorrow.
Frequently Asked Questions (FAQ)
What is Civil 3D software used for?
Autodesk Civil 3D is primarily used for designing and documenting infrastructure projects. This includes road design, land development, site grading, railway corridors, and the layout of storm and sanitary sewer systems. It uses a 3D model-based approach for increased accuracy and efficiency.
Is Civil 3D better than AutoCAD?
For civil engineering tasks, yes, Civil 3D is significantly better than standard AutoCAD. While AutoCAD is a general drafting tool, Civil 3D has specialized, intelligent objects and automated workflows for civil design that dramatically speed up the process and reduce errors.
Is Civil 3D hard to learn?
Civil 3D has a steeper learning curve than basic AutoCAD due to its complexity and model-based environment. However, with structured Civil 3D training and a focus on learning the core workflow, most users can become proficient.
Can I get Civil 3D for free?
Autodesk offers free educational licenses for students and educators. For commercial use, there is a free trial available, but afterward, you must purchase a subscription. There is no free perpetual version for commercial work.
What is the difference between BIM and Civil 3D?
BIM (Building Information Modeling) is a process or methodology for creating and managing information on a construction project. Civil 3D is a software tool that is used to implement the BIM process for infrastructure projects. In short, BIM is the “how,” and Civil 3D is the “what you use.”
What are the main Civil 3D features?
The core features include survey data processing, surface and terrain modeling, alignment and profile design for roads, automated corridor modeling, grading and earthwork tools, and rules-based pipe network design.
What are the system requirements for Civil 3D?
You will need a powerful 64-bit Windows computer. It is recommended to have at least 32 GB of RAM, a fast multi-core processor (3.0+ GHz), a dedicated graphics card (NVIDIA Quadro or similar), and a Solid State Drive (SSD).
How much does a Civil 3D license cost?
As of 2026, an annual subscription for Civil 3D typically costs between $2,500 and $3,000 USD. Pricing can vary, and it is also available as part of the more comprehensive Autodesk AEC Collection.
You May Also Like
 Software
9 Best Free Laser Engraver Software Tools in 2026
 Software
When Fixing Bugs Is No Longer Enough: How to Rescue a Failing Software Project
 SaaS
SaaSNotion vs Coda vs ClickUp for Teams: A Field Report From 18 Months
 SaaS
SaaSTrello vs monday.com vs ClickUp: Which Project Management Tool Fits Your Team in 2026?
 SaaS
SaaS8 Best Asana Alternatives in 2026: Free Tools, Top Competitors, and How to Choose
 Software
What is Asana Software? How Businesses Use It for Project Management and Team Collaboration
 Software
10 Best Audio Redaction Software in 2026 (Tested Picks by Use Case)
 SaaS
SaaS10 Best AI Audio Enhancers for Podcasts in 2026 (Reviewed & Compared)
 Software