


Cognito Forms is useful for collecting structured requests, but a form submission often needs to go somewhere actionable. If your development, IT, or operations team already works in Jira Software Cloud, manually copying each submission into Jira creates unnecessary delays and increases the chance of missing important details.
A Cognito Forms to Jira Software Cloud integration can turn approved form entries into Jira work items automatically. The form can collect a summary, detailed description, priority, category, requester information, and supporting files. An automation platform or webhook then validates that information, maps it to Jira fields, creates the work item, and optionally sends the Jira key back to Cognito Forms.
The best setup depends on how much control you need. Zapier is often the fastest no-code option, while Make provides more visual branching and data transformation. Jira Automation can accept incoming webhooks, and a custom integration using the Jira Cloud REST API provides the most control. The right choice is the simplest method that can handle your field mappings, security requirements, attachments, error recovery, and expected submission volume.
Editorial note: Features, integration limits, and vendor documentation were reviewed on September 1, 2026. App interfaces, pricing, request limits, and available triggers or actions can change.
Testing disclosure: This guide is based on official Cognito Forms, Atlassian, Zapier, and Make documentation. It does not claim a new hands-on benchmark of every workflow described. Test the integration in a non-production Jira space or project before connecting it to live operations.
Key Takeaways
- Direct outcome: A new or approved Cognito Forms entry can automatically create a Jira Software Cloud work item.
- No-code starting point: Zapier and Make both list connectors for Cognito Forms and Jira Cloud.
- Webhook option: Cognito Forms can send JSON data to a Jira Automation incoming webhook or a custom middleware endpoint.
- Custom option: The Jira Cloud REST API provides more control over field mapping, authentication, attachments, transitions, and update logic.
- Plan requirement: Cognito Forms integrations are available on Pro, Team, and Enterprise plans, according to its current documentation.
- Trigger behavior: A Cognito Forms “New Entry” trigger occurs when an action changes an entry from Incomplete to another status. Entries saved through Save and Resume remain incomplete and do not trigger the normal submission webhook.
- Attachments require extra handling: Cognito Forms file links are short-lived—its documentation says about 30 minutes or less—so files should be downloaded promptly before being uploaded to Jira.
- Duplicate prevention matters: Cognito Forms may retry failed webhook deliveries. Use the Cognito entry ID as an idempotency key before creating another Jira work item.
- Jira remains the system of record: Cognito Forms should collect and validate the request, while Jira should own technical workflow status, assignment, comments, and resolution.
- Security extends across every platform: Review Cognito Forms access, automation-platform permissions, Jira permissions, webhook secrets, logs, and data retention.
What Is a Cognito Forms to Jira Integration?
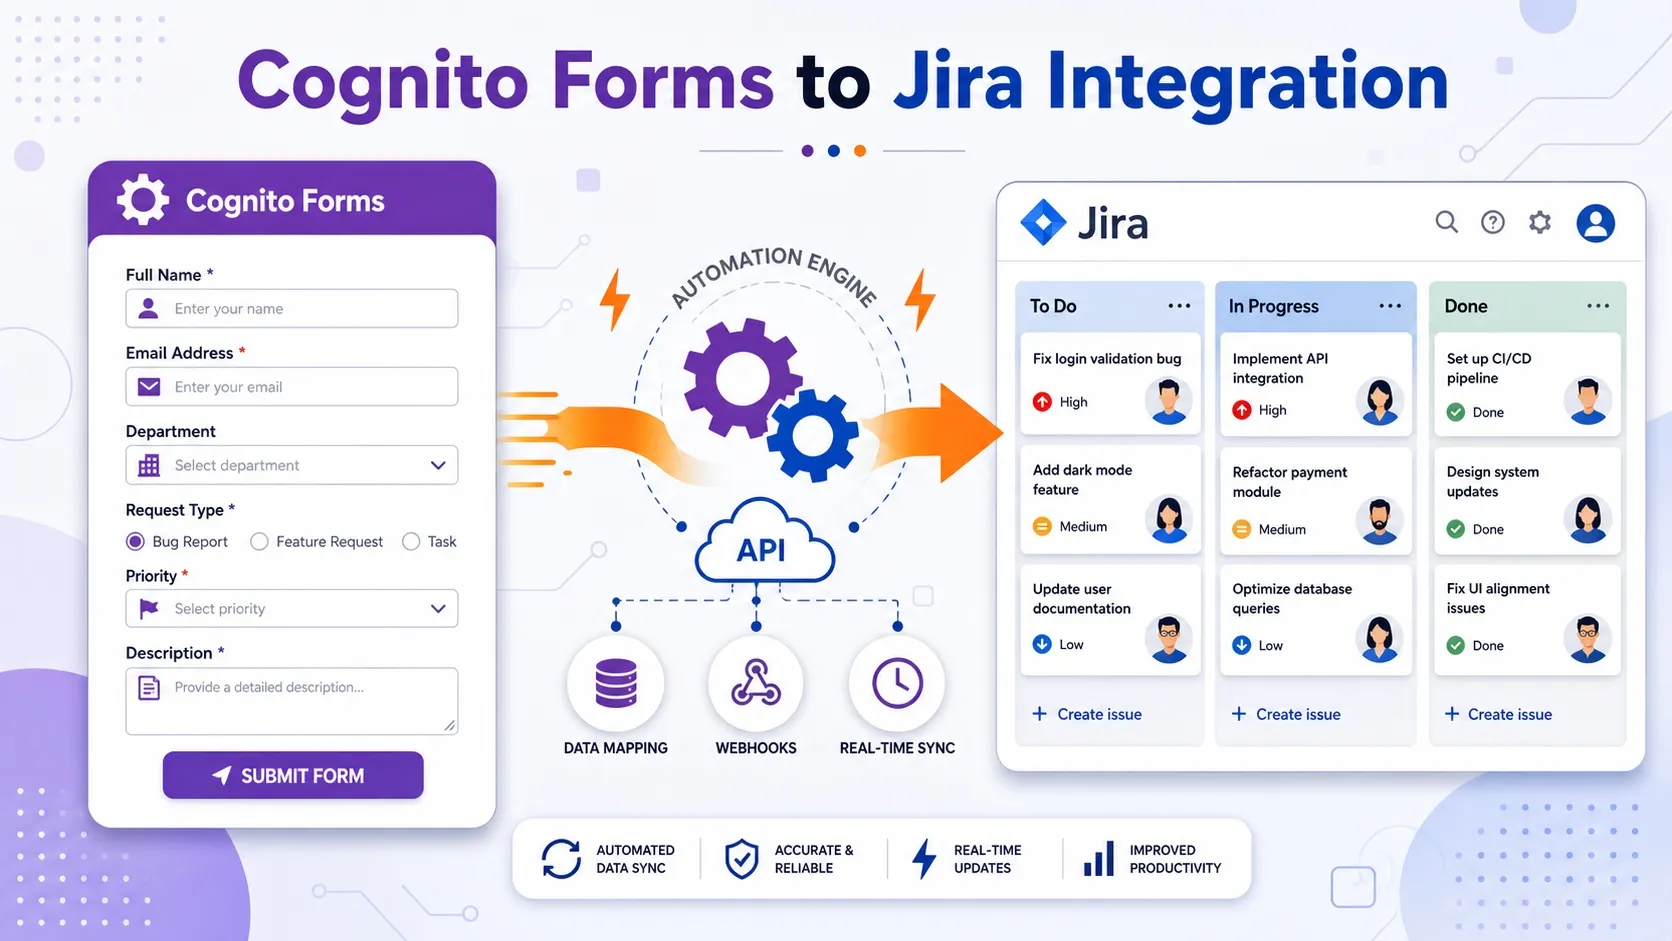
A Cognito Forms to Jira Software Cloud integration transfers form-entry data into Jira so teams can manage the request through an established workflow.
A typical flow looks like this:
Form submitted in Cognito Forms
              ↓
Validation or approval
              ↓
Zapier, Make, webhook, or custom middleware
              ↓
Jira work item created
              ↓
Jira key written back to Cognito Forms
The integration can support several patterns.
One-way creation: A Cognito Forms entry creates a new Jira work item.
One-way updates: An updated form entry adds a comment or changes selected Jira fields.
Two-way workflow: Jira status, assignee, or issue key is written back to the corresponding Cognito Forms entry.
Approval-based creation: A submission reaches Jira only after someone approves it in Cognito Forms.
Attachment transfer: Uploaded files are retrieved from Cognito Forms and attached to the Jira work item.
At the time of review, the practical connection methods documented by the vendors involve Zapier, Make, JSON webhooks, Jira Automation, or custom APIs rather than a dedicated first-party Cognito Forms button that directly configures Jira end to end.
Why Connect Cognito Forms to Jira?
Jira has its own form and intake capabilities, but Cognito Forms may already be used across an organization for public forms, internal approvals, calculations, document generation, or structured business processes.
Connecting the two can help when the people submitting requests should not need direct Jira access.
Bug and Defect Reporting
Use case: Customers, testers, or internal employees submit a structured defect report.
The form can collect:
- Problem summary
- Steps to reproduce
- Expected behavior
- Actual behavior
- Browser or device
- Severity
- Screenshot
- Contact information
- Consent or acknowledgment
The integration can create a Jira bug and route it to the appropriate component or team.
IT and Access Requests
Use case: Employees request software, equipment, access, or technical assistance.
An approval step in Cognito Forms can prevent incomplete or unapproved requests from creating unnecessary Jira work.
Product Feature Requests
Use case: Sales, customer-success, or research teams submit product feedback through a standardized form.
The workflow can assign a product label, include the customer segment, and route the request to the correct product area.
Security or Incident Intake
Use case: An authorized internal form creates a restricted Jira work item for security review.
This workflow requires careful field minimization, issue-security configuration, encrypted form entries where appropriate, and tightly controlled integration credentials.
Operations and Change Requests
Use case: Business teams submit operational or change-management requests without learning the full Jira interface.
Integration Methods Compared
| Method | Setup Difficulty | Data Direction | Attachments | Custom Logic | Best For |
|---|---|---|---|---|---|
| Zapier | Low | One-way or limited two-way | Supported through additional action steps | Moderate | Fast no-code setup |
| Make | Low to medium | One-way or two-way | Supported through file and attachment modules | Strong visual branching | Complex no-code workflows |
| Cognito webhook → Jira Automation | Medium | Mainly Cognito → Jira | Requires additional handling | Moderate | Jira-managed automation |
| Cognito webhook → Middleware → Jira API | High | One-way or two-way | Full control | High | Security-sensitive or custom workflows |
| Cognito Forms API + Jira API | High | Two-way | Full control | Highest | Enterprise integrations |
| Manual CSV or email process | Low | Manual | Manual | Low | Rare or temporary requests |
Which Method Should You Choose?
Choose Zapier for the Fastest Setup
Best for: A straightforward workflow where a new Cognito Forms entry creates a Jira work item.
Zapier currently lists templates for:
- Creating Jira issues from new Cognito Forms entries
- Adding comments to Jira issues
- Adding attachments to Jira issues
- Combining Cognito Forms and Jira with additional workflow steps
This is usually the easiest starting point for teams without dedicated integration developers.
Choose Make for Complex No-Code Logic
Best for: Workflows requiring routers, filters, iterators, repeated data, multiple actions, or more detailed file handling.
Make lists Cognito Forms triggers such as:
- Watch new entries
- Watch updates
- Watch entry deleted
Its Jira Cloud modules include:
- Create an issue
- Update an issue
- Add a comment
- Add an attachment
- Transition an issue
- Search for issues
- Assign or unassign an issue
- Make an authorized API call
Make can be easier to visualize when one submission needs to create multiple Jira records or handle repeating form sections.
Choose Jira Automation for a Jira-Centered Workflow
Best for: Teams that want Jira to handle validation, conditions, assignment, and work-item creation after receiving a webhook.
Cognito Forms sends JSON to an incoming Jira Automation webhook. Jira Automation then reads the values, applies conditions, and creates the work item.
This reduces the number of external platforms, but field transformation and attachment handling may be more limited than with dedicated middleware.
Choose a Custom API Integration for Maximum Control
Best for: High-volume, regulated, security-sensitive, or business-critical workflows.
A custom service can:
- Validate webhook authenticity
- Normalize form data
- Prevent duplicates
- Discover Jira field requirements
- Convert descriptions to Atlassian Document Format
- Create Jira work items
- Upload files
- Write Jira keys back to Cognito Forms
- Maintain detailed logs
- Handle rate limits and retries
- Apply organization-specific security controls
Custom integrations provide flexibility but require engineering ownership and ongoing maintenance.
How to Connect Cognito Forms to Jira with Zapier
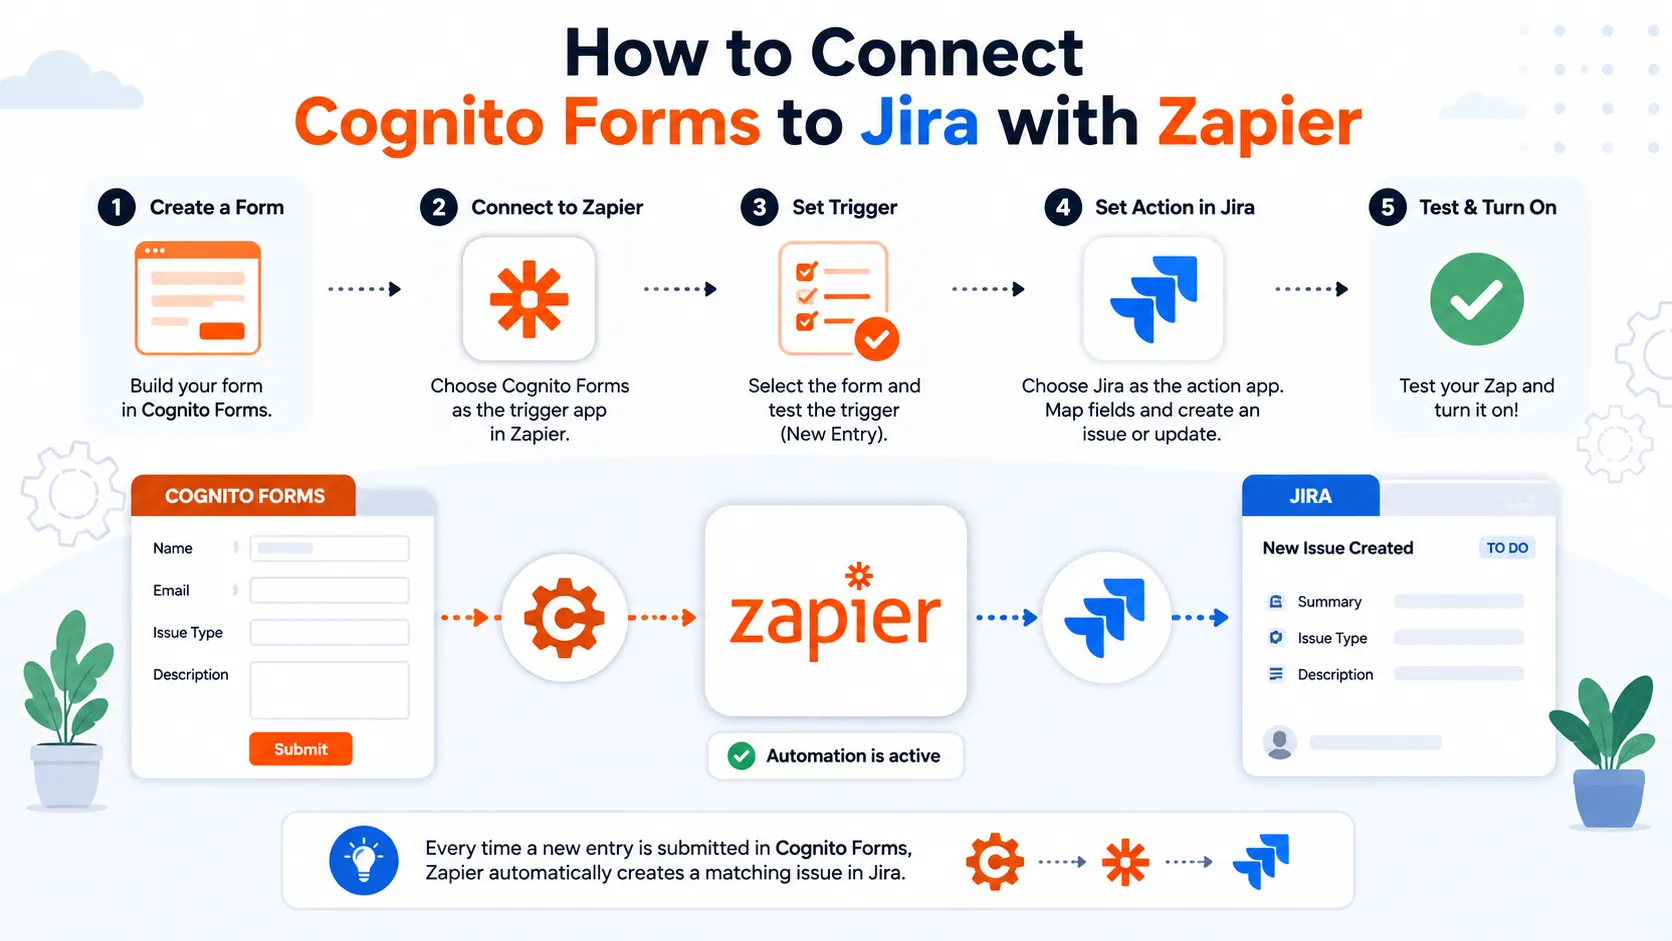
Zapier is usually the most approachable option for a basic no-code connection.
Step 1: Prepare the Cognito Form
Create fields that map cleanly to Jira. A simple bug-report form might include:
- Request title
- Description
- Request type
- Priority
- Product area
- Browser or device
- Steps to reproduce
- Requester email
- File upload
- Consent checkbox
Use choice fields for values that must match Jira options. Free-text fields can create inconsistent values that Jira rejects.
Step 2: Prepare the Jira Project
Confirm:
- The target project or space
- Available work-item types
- Required fields
- Custom-field IDs and options
- Allowed priority values
- Components
- Labels
- Assignee permissions
- Issue-security requirements
- Attachment permissions
A Jira field can be optional in one project and required in another.
Step 3: Create the Zap
- Sign in to Zapier.
- Select Cognito Forms as the trigger application.
- Choose New Entry or another appropriate trigger.
- Connect the Cognito Forms organization.
- Select the form.
- Test the trigger with representative sample data.
- Add Jira Software Cloud as the action application.
- Choose Create Issue or the current equivalent.
- Connect an authorized Jira Cloud account.
- Select the Jira site, project, and work-item type.
- Map the Cognito fields to Jira fields.
- Test the Jira action.
- Verify the created work item in Jira.
- Turn on the Zap.
Zapier’s current Cognito Forms and Jira Software Cloud integration page lists issue creation, comments, and attachment-related workflows. Available fields and actions can vary, so confirm them inside your account.
Step 4: Add a Jira Key Write-Back
After Jira creates the work item, use its returned key—such as APP-123—to update the original Cognito Forms entry.
Store:
- Jira issue ID
- Jira key
- Jira URL
- Synchronization status
- Last synchronization time
- Integration error, if any
The immutable Jira ID is preferable for internal matching, while the human-readable key is useful for display.
How to Connect Cognito Forms to Jira with Make
Make is useful when the workflow needs more than a simple trigger-and-action sequence.
Basic Scenario
- Create a new scenario in Make.
- Add Cognito Forms.
- Select Watch new entries.
- Connect the Cognito Forms organization.
- Select the form.
- Add Jira Cloud Platform.
- Select Create an Issue.
- Map form values to Jira fields.
- Run the scenario once with test data.
- Verify the work item in Jira.
- Set the scenario schedule.
- Turn the scenario on.
The current Make Cognito Forms and Jira Cloud integration page lists modules for creating and updating issues, comments, attachments, transitions, searches, and other Jira operations.
Example Routing Workflow
Imagine an internal technology-request form:
- Requests for laptops go to the Hardware project.
- Access requests go to the Identity project.
- Software defects go to the Application project.
- Critical incidents create a high-priority Jira work item and notify an authorized response channel.
- Low-priority requests remain in Cognito Forms until approved.
Make routers and filters can send each submission down a different path without forcing every request into one Jira project.
Using Cognito Forms Webhooks with Jira Automation
Cognito Forms supports JSON webhooks for submit, update, and delete events on Pro, Team, and Enterprise plans.
Step 1: Create the Jira Automation Rule
- Open Jira Automation.
- Create a new rule or flow.
- Select Incoming webhook as the trigger.
- Add conditions or validation.
- Add the Create work item action.
- Map incoming webhook values to Jira fields.
- Turn on the automation.
- Copy the webhook URL and secret.
Atlassian’s current incoming webhook flow uses a unique token. The preferred method sends the token in the X-Automation-Webhook-Token header.
If the sending system cannot add custom headers, Atlassian documents an alternative where the secret is appended to the URL. The header approach is preferable because it handles the secret more securely.
Step 2: Configure Cognito Forms
- Open the form.
- Go to Form Settings.
- Enable Post JSON Data to a Website.
- Paste the approved Jira Automation webhook endpoint.
- Configure the submit endpoint.
- Add update or delete endpoints only if required.
- Save the form.
- Submit a test entry.
Cognito Forms allows developers to customize JSON field names through Developer Mode. Stable, descriptive JSON names make Jira smart-value mapping easier.
Step 3: Review the Audit Logs
Check both systems:
- Cognito Forms entry audit log
- Jira Automation audit log
- Jira work-item history
- Integration or middleware logs
A successful HTTP response only confirms delivery. Verify that the correct Jira work item was created with the expected fields.
Recommended Field Mapping
| Cognito Forms Field | Jira Field | Mapping Guidance |
|---|---|---|
| Entry ID | Custom external ID | Use for duplicate prevention |
| Request title | Summary | Keep concise and searchable |
| Description | Description | Combine structured context where useful |
| Request category | Work-item type, component, or custom field | Use controlled values |
| Priority | Priority | Map each form option to an existing Jira value |
| Product area | Component or label | Confirm the option exists |
| Requester email | Custom field | Avoid assuming it maps to Reporter |
| Steps to reproduce | Description or custom field | Preserve line breaks |
| Environment | Environment | Jira API v3 may require ADF formatting |
| Due date | Due date | Normalize to Jira’s accepted format |
| Uploaded file | Attachment | Download before the Cognito link expires |
| Form URL | Custom field or description | Restrict links containing sensitive access tokens |
| Approval status | Label or custom field | Consider creating Jira work only after approval |
| Jira key | Cognito Forms field | Write back after creation |
| Sync status | Cognito Forms field | Record success or failure |
Handling Jira Custom Fields
Custom fields are a common cause of failed integrations.
The visible label is not always enough. Jira may require:
- A custom-field ID
- A specific option ID
- An account ID
- A date in a required format
- An object rather than plain text
- Atlassian Document Format for multi-line text
- A value allowed by the target project and work-item type
The Jira Cloud REST API documentation explains that creatable fields depend on the target project, work-item type, create screen, and connected user’s permissions.
Before building automation:
- Create a Jira work item manually.
- Identify every required field.
- Record the accepted values.
- Test each custom field separately.
- Add optional fields only after the basic workflow succeeds.
Handling File Attachments
Attachments usually require more than mapping a file URL into the Jira description.
Cognito Forms states that file-upload and generated-document links sent through JSON webhooks are valid for only a short period—approximately 30 minutes or less.
A reliable attachment workflow should:
- Receive the Cognito Forms event.
- Create the Jira work item.
- Capture the Jira ID or key.
- Download the file immediately.
- Upload the file to Jira.
- Confirm the upload succeeded.
- Remove temporary file copies according to retention policy.
- Record the result in the integration log.
For custom API integrations, Jira accepts attachments as multipart/form-data. Atlassian also requires the X-Atlassian-Token: no-check request header and appropriate Jira project permissions.
The connected account needs:
- Browse project permission
- Create attachments permission
- Access permitted by any issue-security configuration
Do not place a short-lived Cognito file URL in Jira and assume the file has been preserved.
Preventing Duplicate Jira Work Items
Duplicate creation is one of the most important reliability problems to solve.
Cognito Forms retries webhook events that receive many 4xx or 5xx responses. Its documentation states that retries may occur up to 15 times over 72 hours, except for HTTP 404, 410, and 413 responses.
Retries improve delivery reliability, but they can create duplicates if the destination successfully creates a Jira item and then fails before returning a success response.
Recommended Idempotency Pattern
Use the Cognito Forms entry ID as a unique external identifier.
Before creating a Jira work item:
- Read the Cognito entry ID.
- Search the integration database or Jira for that ID.
- If a matching Jira item exists, update or return it.
- If no match exists, create the item.
- Store the Jira ID and key against the Cognito entry ID.
- Return a successful response only after the mapping is saved.
For simpler no-code workflows, store the Jira key in the Cognito Forms entry and add a condition that continues only when the Jira key is empty.
This is not as strong as transactional idempotency, but it can reduce ordinary duplicate creation.
Designing a Reliable Approval Workflow
Sending every submission directly to Jira may create noise. A more practical workflow is:
Form submitted
      ↓
Cognito status: Submitted
      ↓
Validation and review
      ↓
Approved?
  ↙         ↘
No           Yes
↓             ↓
Return for    Create Jira work item
correction    and write key back
Why it helps: Incomplete, spammy, duplicate, or out-of-scope requests can be reviewed before they reach the engineering backlog.
A mature form should validate:
- Required fields
- Summary length
- Approved categories
- Priority justification
- Contact information
- Attachment type and size
- Consent requirements
- Duplicate submissions
Two-Way Synchronization
A basic workflow creates Jira work from Cognito Forms. A more advanced setup can also send Jira changes back.
Possible write-back fields include:
- Jira key
- Jira URL
- Current status
- Assigned team
- Resolution
- Last updated time
- Rejection reason
Define Field Ownership
Avoid allowing both platforms to freely edit the same field.
A safer model is:
| Field | System of Record |
|---|---|
| Requester details | Cognito Forms |
| Original request | Cognito Forms |
| Jira ID and key | Jira |
| Technical status | Jira |
| Assignee | Jira |
| Engineering comments | Jira |
| Approval status | Cognito Forms |
| Resolution | Jira |
| Synchronization status | Integration layer |
Prevent Update Loops
Use:
- Source markers
- Last-synced timestamps
- Stable entry and issue IDs
- Status checks
- Idempotency rules
- Integration-user detection
- Field-level ownership
Without these controls, a Jira update can update Cognito Forms, which triggers another Jira update, creating an unnecessary loop.
Security and Privacy
The integration handles data across at least two systems—and often three if Zapier or Make is involved.
Apply Least Privilege
The Jira connection should have only the permissions required to:
- Browse the target project
- Create the required work-item type
- Edit approved fields
- Add attachments where necessary
- Add comments if required
Avoid connecting a Jira site administrator unless the workflow genuinely requires administrative capabilities.
Protect Webhook Secrets
- Prefer the
X-Automation-Webhook-Tokenheader when supported. - Do not place secrets in documentation or screenshots.
- Restrict access to automation editors.
- Rotate the token if exposure is suspected.
- Treat URLs containing secrets as credentials.
- Avoid logging complete webhook URLs.
Minimize Form Data
Do not send sensitive fields to Jira merely because the form collected them.
Review whether Jira needs:
- Personal contact details
- Payment information
- Health information
- Identity documents
- Internal legal notes
- Security findings
- Uploaded files
- Electronic signatures
Use field-level encryption and appropriate Cognito Forms plan features where required. Confirm that Jira, the connector, and all subprocessors are approved for the data category.
Protect Logs
Automation logs can contain full form payloads. Restrict log access and define a retention period.
Validate Untrusted Input
Form entries are user-supplied input. Validate length, format, permitted values, and attachment types before using them to create Jira content or determine routing.
Integration Limits and Cost Considerations
Cognito Forms currently documents the following included monthly integration requests:
- Pro: 2,000 requests per month
- Team: 10,000 requests per month
- Enterprise: 100,000 requests per month
These limits cover Make, Power Automate, Zapier, JSON webhooks, and Cognito Forms API requests.
Cognito Forms also states:
- Requests are counted per 100 KB.
- A 150 KB payload counts as two requests.
- A 400 KB payload counts as four requests.
- API requests are limited to 300 requests per five minutes.
- Additional usage is currently billed in buckets, subject to its billing terms.
Confirm current pricing before publication or purchase.
Estimate the Real Cost
A single form submission may create multiple billable operations:
- Trigger from Cognito Forms
- Create Jira work item
- Download a file
- Upload the file
- Update the Cognito entry
- Send a notification
- Search for duplicates
The effective monthly cost depends on:
- Submission volume
- Average payload size
- Number and size of attachments
- Automation-platform tasks or operations
- Jira Automation usage
- Retry frequency
- Custom hosting
- Monitoring and maintenance
Start with a representative monthly volume rather than comparing only entry-level subscription prices.
Common Problems and Fixes
Jira Rejects a Required Field
Cause: The form does not provide a field required by the Jira create screen.
Fix: Review the target project and work-item type. Add the missing value or update the Jira field configuration.
Priority or Component Is Invalid
Cause: Cognito Forms sends display text that does not match an accepted Jira option.
Fix: Create an explicit mapping table instead of passing raw text directly.
Reporter Cannot Be Assigned
Cause: Jira Cloud user fields commonly require an Atlassian account ID, and the requester may not be a Jira user.
Fix: Use the integration account as Reporter and store the requester’s name or email in an approved custom field.
Save and Resume Does Not Trigger the Workflow
Cause: Saved entries remain Incomplete.
Fix: Trigger Jira creation only after submission or an approved workflow action changes the entry from Incomplete.
Attachments Are Missing
Cause: The Cognito Forms file link expired, or the Jira account lacks attachment permission.
Fix: Download files promptly and verify Browse Project and Create Attachments permissions.
Duplicate Work Items Appear
Cause: The webhook or automation retried after an ambiguous failure.
Fix: Use the Cognito Forms entry ID as an external idempotency key.
Jira Description Formatting Breaks
Cause: Jira REST API v3 uses Atlassian Document Format for description, environment, and multi-line custom fields.
Fix: Convert the submitted text into valid ADF or use a connector that performs the conversion.
The Integration Stops at High Volume
Cause: Cognito Forms, Jira, or the automation platform reached a rate or usage limit.
Fix: Add queueing, backoff, lower concurrency, and monitoring. Review usage before increasing form traffic.
When This Integration Is a Good Fit
Choose a Cognito Forms to Jira integration when:
- External users should not need Jira accounts.
- The form requires calculations or approval steps.
- Multiple business teams submit technical requests.
- Jira remains the operational system of record.
- Structured intake improves issue quality.
- Submission volume justifies automation.
- The organization approves the connector and data flow.
When to Use Another Approach
Consider Jira’s native forms or Jira Service Management when:
- All requests should stay inside Atlassian.
- Portal access and request visibility are important.
- SLA management is required.
- Requester communication should occur through Jira.
- Avoiding an additional data processor is a priority.
- The workflow does not need Cognito-specific calculations or document generation.
If the main requirement is reporting rather than intake, a Jira Software Cloud Google Sheets integration may be a better fit.
For broader automation planning, see What Is No-Code Automation?. Teams comparing project-management workflows may also find the Jira vs. Trello comparison useful.
Frequently Asked Questions
Does Cognito Forms integrate directly with Jira Software Cloud?
Not as a complete first-party setup reviewed here: The most practical documented methods use Zapier, Make, JSON webhooks, Jira Automation, or a custom REST API integration.
Can a Cognito Forms submission create a Jira issue?
Yes: Zapier, Make, Jira Automation, or the Jira REST API can create a Jira work item from a form submission.
Can the integration add attachments to Jira?
Yes, with additional handling: Retrieve the uploaded file before its Cognito Forms link expires, create the Jira work item, and then upload the file using a connector or Jira attachment API.
Does the integration support two-way sync?
It can: Two-way synchronization requires additional steps to update Cognito Forms after Jira changes. Define field ownership and loop-prevention rules before enabling it.
Which Cognito Forms plans support integrations?
Current documentation: Zapier, Make, JSON webhooks, and the API are available on Pro, Team, and Enterprise plans.
Will Save and Resume create a Jira work item?
Not by default: Entries saved through Save and Resume remain Incomplete and do not trigger the normal new-entry webhook. Create the Jira work item after final submission or an approved workflow action.
Can I assign the Jira work item to the form submitter?
Only when Jira can identify and assign that person: Jira Cloud typically uses account IDs for user fields. External form respondents may not have Jira accounts, so storing their details in an approved custom field is often more reliable.
How do I prevent duplicate Jira issues?
Use a stable external identifier: Store the Cognito Forms entry ID in Jira and the Jira ID or key in Cognito Forms. Check for an existing mapping before creating another work item.
Is Zapier or Make better?
Zapier: Usually easier for a straightforward trigger-and-action workflow.
Make: Often better for branching, repeated data, file processing, and multi-step transformations.
Neither is universally better; compare supported fields, operation limits, error handling, security, and total cost.
Should Jira or Cognito Forms be the system of record?
Recommended model: Cognito Forms owns the original request and approval data, while Jira owns engineering workflow, assignment, technical status, and resolution.
Final Verdict
A Cognito Forms to Jira Software Cloud integration is valuable when people need a simple, structured form while the delivery team needs requests managed in Jira.
For most teams, the best starting point is:
- Build a focused Cognito form.
- Validate required fields and controlled values.
- Add an approval step if submissions need review.
- Use Zapier for a simple workflow or Make for more complex branching.
- Use Jira Automation or custom middleware when tighter control is required.
- Store the Cognito entry ID and Jira ID in both systems.
- Handle file links immediately.
- Monitor failures, retries, and monthly usage.
- Keep Jira as the operational system of record.
The integration should reduce manual work without creating duplicate tickets, exposing sensitive data, or turning the workflow into an unmaintainable chain of automations. Start with one well-defined intake process, test failure cases as carefully as successful submissions, and expand only after ownership and monitoring are clear.
You May Also Like
 Cloud Computing
8 Best AWS S3 Alternatives Compared: Pricing, Egress, and S3 Compatibility
 SaaS
SaaSWhat is Confluence Used For In Project Management?
 Web Development
Building Apps with Lovable and Supabase: A Step-by-Step Guide
 Web Development
Heroku vs. Netlify (2026): Pricing, Features, and Best Uses
 Software
When Fixing Bugs Is No Longer Enough: How to Rescue a Failing Software Project
 SaaS
SaaS25 Best Pipedrive Integrations to Automate Sales and Grow Your Business
 SaaS
SaaS10 Best Virtual Phone Number Services for 2026: A Practical Buying Guide
 SaaS
SaaSCloud Based Software for Business: What the Switch Really Delivers, in Numbers
 SaaS
SaaS